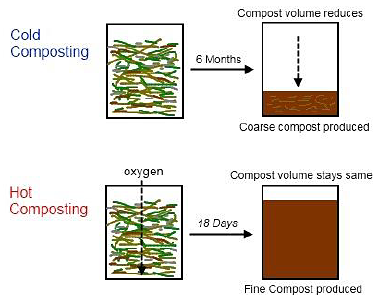
The term “hot composting” refers to a method in which microbial activity within the compost pile is at its optimum level, which results in finished compost in a much shorter period of time. Hot composting requires air and moisture to work effectively.
Hot Composting vs Cold Composting
Hot composting has the benefits of killing weed seeds and pathogens (diseases), and breaking down the material into very fine compost. In contrast, cold composting does not destroy seeds, so if you cold compost weeds, any weed seeds will grow when you put the compost into the garden.
Cold composting does not destroy pathogens either, so if you put diseased plants into your cold compost, the diseases may spread into the garden, hence the common advice not to (cold) compost diseased plants.
The other issue with cold composting is that you end up with lots of large pieces left over in the compost when the process is completed, whereas hot compost looks like fine black humus (soil).
Hot composting produces a larger volume of compost than cold composting

The most famous hot composting method, the Berkeley method, developed by the University of California, Berkley, is a fast, efficient, high-temperature, composting technique which will produce high quality compost in 18 days.
The requirements for hot composting using the Berkley method are as follows:
- Compost temperature is maintained between 55-65 degrees Celsius
- The C:N (carbon:nitrogen) balance in the composting materials is approximately 25-30:1
- The compost heap needs to be roughly 1.5m high
- If composting material is high in carbon, such as tree branches, they need to be broken up, such as with a mulcher
- Compost is turned from outside to inside and vice versa to mix it thoroughly
With the 18 day Berkley method, the procedure is quite straightforward:
- Build compost heap
- 4 days – no turning
- Then turn every 2nd day for 14 days
Carbon v Nitrogen:
Carbon equals brown equals dry; i.e., Materials that are high in carbon are typically dry, “brown” materials, such as sawdust, cardboard, dried leaves, straw, branches and other woody or fibrous materials that rot down very slowly
Nitrogen equals green equals wet; i.e., Materials that are high in nitrogen are typically moist, “green” materials, such as lawn/grass clippings, fruit and vegetable scraps, animal manure and green leafy materials that rot down very quickly.
Compost activators:
- Comfrey
- Molasses
- Coffee grounds
Simplified Version:
Basically, to get started in a hurry, aim to use 1/3 Manure and 2/3 dry carbon materials. It will work. Just pile alternating thin layers of greens and browns until you end up with a compost heap that is 1 metre square and a bit taller than that. There’s no real need to get caught up in the mathematics of precise C:N ratios.
- Put some sticks on the ground (aeration)
- A layer of carbon (straw), thick layer (about 6 inches or 150 mm)
- A layer of nitrogen (horse, cow, sheep poo*), this layer will be about 1/3 of the carbon layer, i.e., a thin layer about 2 inches or 50 mm (Spread some coffee grounds if you have them)
- Use a watering can to sprinkle with diluted molasses and comfrey tea until moist but not wet. Just sprinkle with water if comfrey and molasses are not available
- Repeat until pile is +/- 1 metre high
- Cover with plastic to prevent getting too wet from rain or drying out from too much sun
- Pile will heat. Wait a few days, say 4 to 5, or until pile cools a little and turn
- Repeat after 2-3 days
*Apologies for use of technical terms
